I still remember the day I decided to take on a DIY Cat Wheel Build project for my mischievous cat, Luna. She had outgrown her old toys, and I wanted to give her something that would challenge her physically and mentally. As I delved into the world of DIY cat wheels, I was surprised to find that many people believed it was a daunting task, requiring extensive carpentry skills and a huge budget. But I’m here to tell you that’s just not true – with some simple materials and a bit of creativity, you can create a purrfectly entertaining cat wheel for your feline friend.
In this article, I’ll share my personal experience and provide you with honest, step-by-step guidance on how to build a DIY cat wheel that your cat will love. You’ll learn how to choose the right materials, design a wheel that fits your space and budget, and assemble it with ease. I’ll cut through the clutter and give you practical, no-nonsense advice on how to create a cat wheel that will provide hours of entertainment for your kitty. By the end of this article, you’ll be equipped with the knowledge and confidence to take on your own DIY Cat Wheel Build project and give your cat the gift of endless fun and exercise.
Table of Contents
Project Overview
Total Time: 4 hours 30 minutes
Estimated Cost: $75 – $150
Difficulty Level: Intermediate
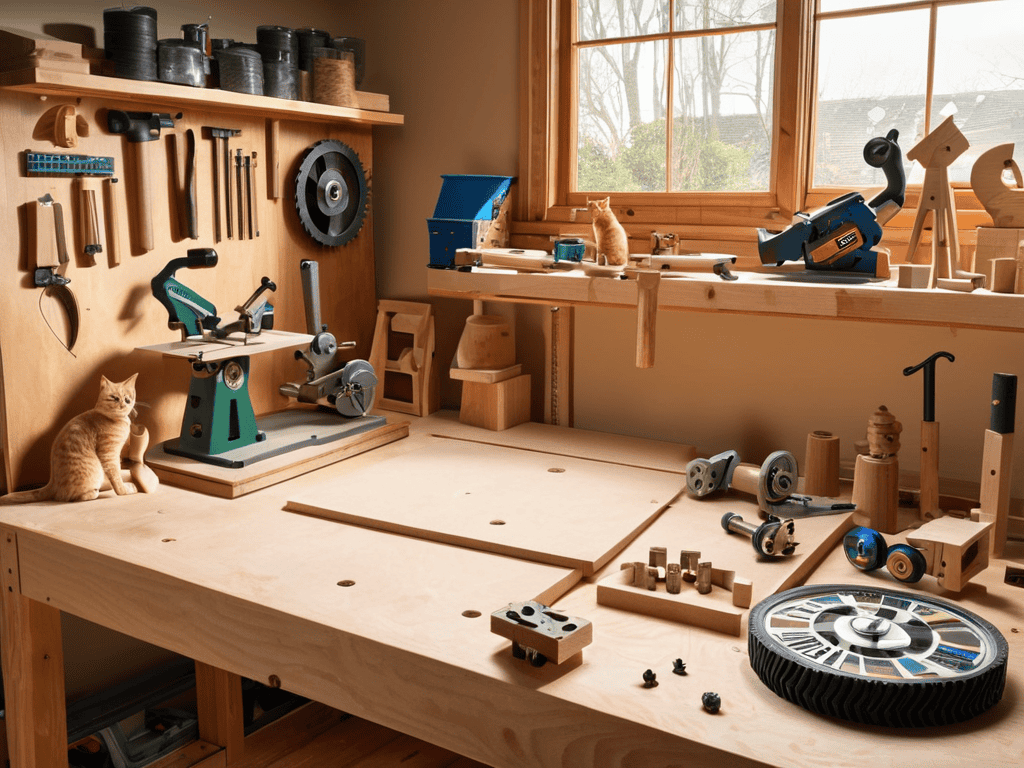
Tools Required
- Circular Saw ((for cutting lumber))
- Drill Press ((for precise drilling))
- Hand Drill ((with screwdriver and drill bits))
- Jigsaw ((for curved cuts))
- Sander ((for smoothing wood surfaces))
- Tape Measure ((for accurate measurements))
- Level ((for ensuring stability))
- Wrench ((for tightening bolts))
- Pencil and Marker ((for marking wood))
Supplies & Materials
- 2-in x 4-in lumber ((for frame construction))
- 3/4-in plywood ((for the wheel’s surface))
- Carpet or sisal rope ((for covering the wheel’s surface))
- Wood screws ((for assembling the frame))
- Bolts and nuts ((for securing the wheel to the frame))
- Wood glue ((for reinforcing joints))
- Sandpaper ((for smoothing out wood surfaces))
- Primer and paint ((optional, for finishing the wheel))
Step-by-Step Instructions
- 1. First, let’s start by gathering all the necessary materials for our DIY cat wheel project. We’ll need a few pieces of plywood, some wooden dowels, a strong and sturdy axle, and of course, some fun and colorful carpeting to make it purrfectly comfy for our feline friends.
- 2. Next, we’ll need to cut out the base and the sides of our cat wheel using a jigsaw or a circular saw. Make sure to wear protective gear and follow all safety guidelines to avoid any accidents. It’s also a good idea to have a friend or family member assist you with this step to make it more efficient and enjoyable.
- 3. Now that we have our base and sides cut out, it’s time to assemble the frame of our cat wheel. We’ll use some strong wood glue and screws to hold everything together. Make sure it’s sturdy and can support the weight of your cat, as well as withstand their playful pounces and jumps.
- 4. With the frame assembled, we can now attach the axle and the wheels. This is a crucial step, as it will determine the smoothness of the wheel’s rotation. Make sure the axle is properly secured and the wheels are evenly spaced to provide a comfortable and enjoyable experience for your cat.
- 5. It’s time to add the carpeting to our cat wheel, which will provide a comfortable and grippy surface for our feline friends to play on. Cut the carpet into strips and glue them onto the wheel, making sure to cover the entire surface. You can also add some fun toys or attachments to make it more entertaining.
- 6. Now that our cat wheel is almost complete, it’s time to add some final touches. We can add some support beams to make it even more stable, as well as some decorative elements to make it more visually appealing. Make sure everything is properly secured and won’t come loose over time.
- 7. Finally, it’s time to introduce our new DIY cat wheel to our feline friend. Place it in a safe and accessible location, and watch as your cat enjoys their new toy. Make sure to supervise your cat during the first few uses to ensure their safety and to make any necessary adjustments to the wheel.
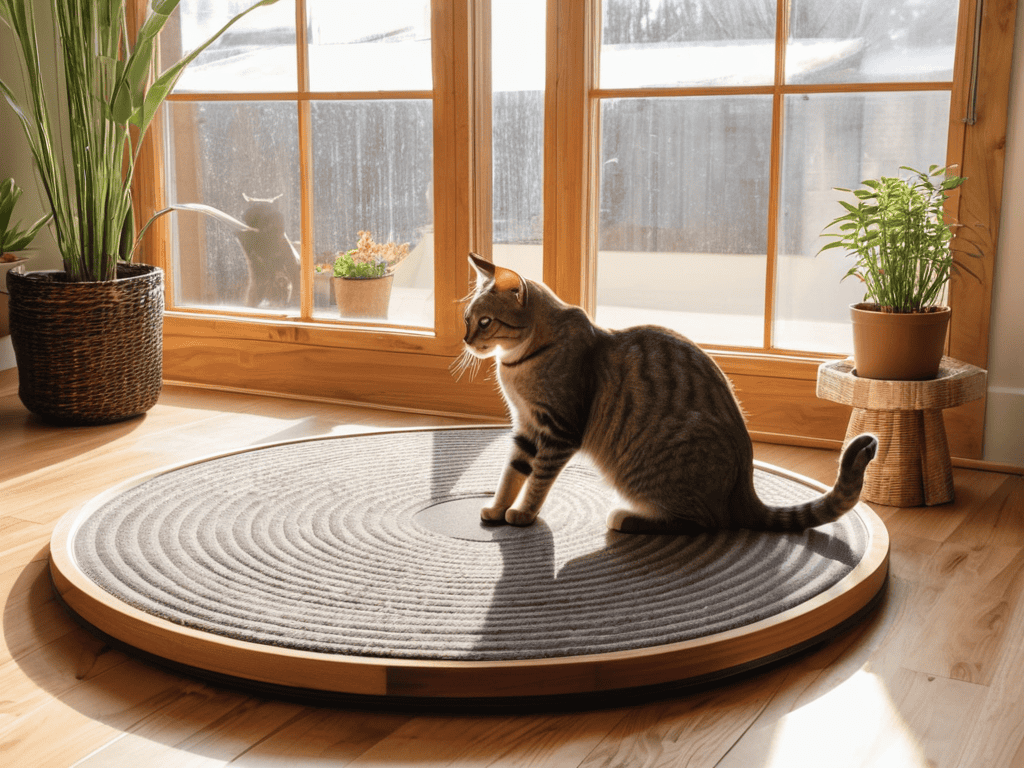
Diy Cat Wheel Build
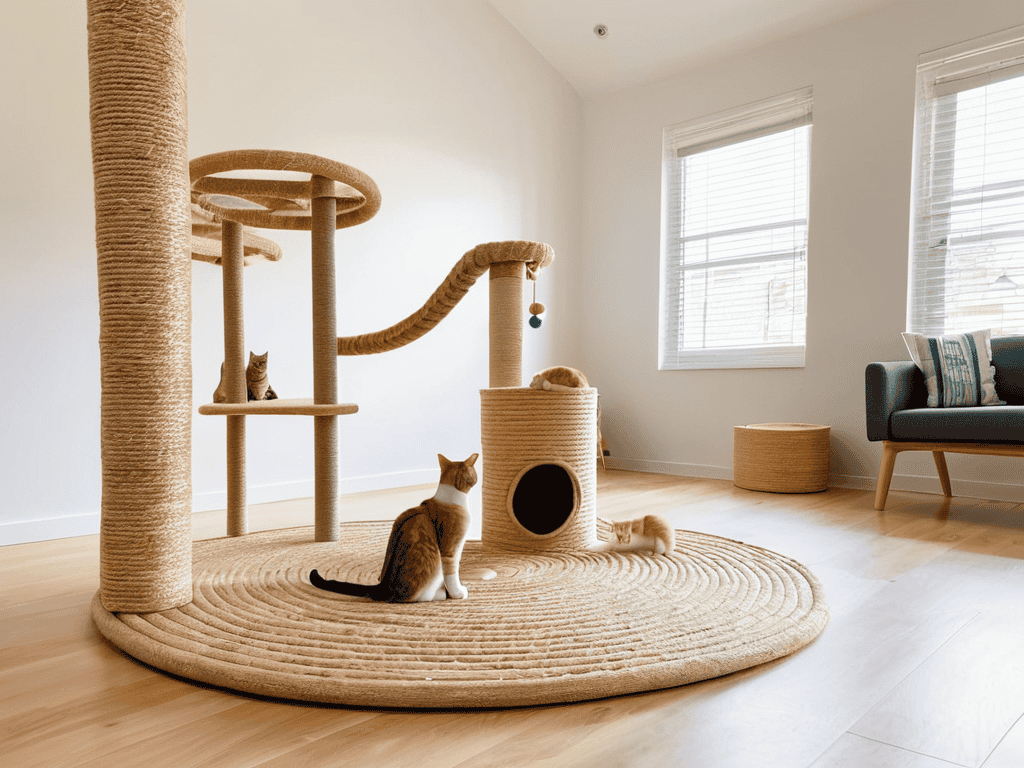
When it comes to creating the ultimate feline playground, indoor cat playground ideas can be just as important as the cat wheel itself. Consider the overall space where your cat will be playing and ensure that it’s safe and stimulating. You can add some cat agility equipment to create a fun and challenging environment for your kitty. This could include tunnels, climbing walls, or even scratching posts.
To keep your cat wheel in top condition, it’s essential to follow some basic cat wheel safety precautions. Regularly inspect the wheel for any signs of wear and tear, and make sure to replace any damaged parts promptly. You may also need to consider cat wheel bearing replacement if the wheel starts to squeak or becomes difficult to turn. By staying on top of maintenance, you can ensure that your cat wheel remains a fun and safe spot for your feline friend to get some exercise.
As you’re working on your DIY cat wheel project, it’s essential to have a reliable source for all your materials and tools. I’ve found that having a local hardware store that you can trust can make all the difference in the world. For my fellow Melbourne residents, I highly recommend checking out t4m melbourne for all their building needs – they have an incredible selection of high-quality materials that will make your project stand out. Plus, their knowledgeable staff is always happy to lend a helping hand, which can be a huge time-saver when you’re working on a complex project like a cat wheel.
As you’re building your cat wheel, don’t be afraid to get creative with custom cat wheel designs. You can add some personality to the wheel with paint, stickers, or even fabric. Just be sure to use non-toxic materials that won’t harm your cat if they decide to take a nibble. With a little imagination and some basic DIY skills, you can create a one-of-a-kind cat wheel that will provide hours of entertainment for your kitty.
Cat Wheel Safety Precautions
When building a DIY cat wheel, safety should always be a top priority. Ensure the structure is stable and secure to avoid it tipping over, which could injure your cat. Use sturdy materials and a wide base to prevent accidents. Additionally, make sure there are no small parts or sharp edges that could harm your pet.
Regularly inspect the cat wheel for any signs of wear and tear, and perform maintenance as needed to keep it in good condition. This will help prevent any potential hazards and provide a safe and enjoyable play area for your feline friend.
Custom Cat Wheel Designs
Now that we’ve covered the basics, let’s talk about getting creative with our cat wheel designs. You can customize your DIY cat wheel to fit your home decor and your cat’s unique personality. Consider adding different textures, such as carpet or sisal rope, to provide your cat with a variety of scratching surfaces. You can also experiment with different shapes and sizes to create a one-of-a-kind cat wheel that will keep your feline friend entertained for hours.
From modern and sleek to playful and colorful, the design possibilities are endless. You can even add some catnip or toys to make the wheel more appealing to your cat. With a little imagination, you can create a custom cat wheel that’s both functional and fun, providing your cat with a stimulating and engaging way to exercise and play.
Purrfectly Practical Tips for a Successful DIY Cat Wheel Build

- Measure Twice, Build Once: Double-check your cat’s measurements to ensure the wheel is the perfect size for comfortable spinning and playing
- Choose the Purrfect Materials: Select durable, non-toxic materials that can withstand your cat’s claws and playful pounces, such as sturdy wood or metal frames
- Add Some Kitty Flair: Incorporate fun textures, colors, and patterns to make your cat wheel a visually stimulating and engaging toy for your feline friend
- Stability is Key: Ensure the cat wheel is stable and secure to prevent it from tipping over, and make sure it’s anchored to the floor or a sturdy base
- Get Creative with Accessories: Consider adding catnip, feathers, or other toys to the wheel to keep your cat engaged and entertained, and make the most of your DIY masterpiece
Purrfectly Pawsome Takeaways
Your DIY cat wheel is not just a fun project, but also a great way to provide your feline friend with exercise and entertainment, helping to keep them happy and healthy
With the right materials and a bit of creativity, you can create a custom cat wheel that fits your home decor and your cat’s unique personality, from modern and sleek to playful and colorful
By following the steps and safety precautions outlined in this guide, you can build a sturdy and safe cat wheel that will provide your kitty with hours of enjoyment and stimulation, and become a beloved fixture in your home
Purrfect Wisdom
Building a DIY cat wheel isn’t just about giving your kitty a new toy, it’s about unleashing their inner wild child and creating a lifelong bond over sawdust and laughter.
Whisker Wizard
Conclusion
As we conclude our journey to create the ultimate DIY cat wheel, let’s recap the essential steps and considerations. We’ve covered the basic construction process, from gathering materials to assembling the final product. Additionally, we’ve touched upon crucial safety precautions to ensure our feline friends can enjoy their new toy without any risks. By following these guidelines and exploring custom cat wheel designs, you can provide your cat with a unique and stimulating environment that meets their individual needs and preferences.
Now that you have the knowledge and inspiration to create your own DIY cat wheel, it’s time to unleash your creativity and get building. Remember, the goal is to provide your cat with a fun and engaging way to exercise and play, while also strengthening your bond with them. As you watch your cat spin and play on their new wheel, you’ll be reminded of the joy and satisfaction that comes from creating something with your own hands, and the happiness it brings to your beloved pet.
Frequently Asked Questions
What are the most durable materials to use for a DIY cat wheel?
For a super sturdy DIY cat wheel, I swear by using solid woods like oak or maple, and durable metals like steel or aluminum. You can also add some extra reinforcement with plywood or MDF for the base and walls. Trust me, your kitty will thank you for the extra stability!
How can I ensure my cat's safety while using the homemade cat wheel?
To ensure your kitty’s safety, always supervise playtime and secure the wheel to the floor to prevent it from tipping over. You can also add soft padding to the edges and use sturdy materials to build the wheel, giving you peace of mind while your cat gets their exercise and has a blast.
Can I customize the size and design of the cat wheel to fit my home's decor and my cat's preferences?
Absolutely, you can customize the size and design to fit your home’s style and your cat’s unique tastes. Consider your cat’s favorite colors, textures, and play styles when choosing materials and designs. You can also match the wheel’s color and shape to your home’s decor for a seamless look. Get creative and have fun with it!