The first time I slipped my hands into a swatch of full‑grain calf, the workshop was already humming with the buzz of a local boutique order. I was still a teenager, watching my parents negotiate the price of a single stitch, and I realized that crafting professional leather footwear isn’t about fancy machinery—it’s about a single, deliberate cut that turns raw hide into a confidence‑boosting sole. The myth that you need a million‑dollar press to create runway‑ready shoes? Wrong. The real secret lies in treating every seam as a strategic investment, just like balancing a ledger. That lesson taught me that the true ROI comes from patience, not pressure.
In this guide I’ll walk you through the exact workflow I use with my own small‑batch studio: from sourcing ethically‑tanned leather that respects your budget, to drafting a pattern that maximizes material efficiency, and then mastering the hand‑stitch techniques that give a shoe its lasting precision. You’ll get printable checklists, a simple cost‑analysis spreadsheet, and three productivity rituals—like my morning haiku ritual—that keep your project on schedule and your profit margins healthy. By the end, you’ll be ready to launch shoes that feel as good on the foot as they do on the balance sheet, and a plan for scaling your line.
Table of Contents
- Step-by-Step Instructions
- Selecting Premium Leathers for Highend Shoe Excellence
- Optimizing Professional Leatherworking Techniques Construction Workflow
- 5 High‑Performance Tips for Crafting Professional Leather Footwear
- Key Takeaways for Mastering Premium Leather Footwear
- Stitching Success into Every Sole
- Final Stitch, Final Triumph
- Frequently Asked Questions
Guide Overview
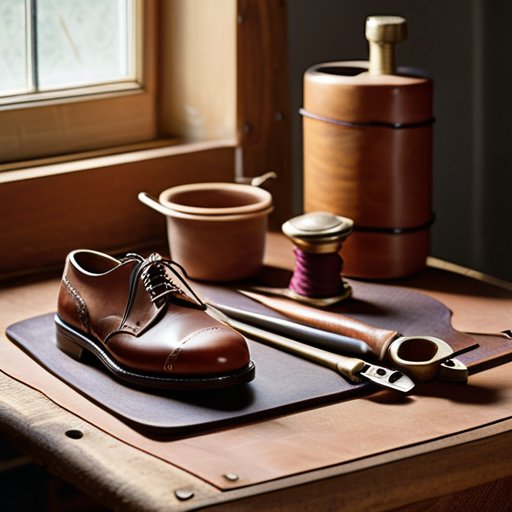
Tools & Supplies
- Rotary cutter or utility knife – precise leather cutting
- Heavy‑duty shoe stitching machine or hand stitching awl – for durable seams
- Shoe last (size‑appropriate) – forms the shape of the shoe
- Lasting hammer – secures upper to the insole
- Edge beveler – trims outsole edges
- Skiving knife – thins leather edges for smooth stitching
- Heat gun or shoe press – shapes and bonds materials
- Leather adhesive (contact cement) – bonds soles and uppers
- Full‑grain leather (upper) – 2–3 sq ft
- Leather outsole material (e.g., Vibram) – one pair
- Midsole material (e.g., PU foam) – 1 sheet
- Lining leather or textile – 1 sq ft
- Waxed nylon shoe‑stitching thread – 2 spools (100 yd each)
- Leather edge paint or sealant – 1 oz bottle
- Eyelets or metal hardware – set of 20
- Shoe glue (contact cement) – 1 oz tube
- Sandpaper (various grits) – assorted pack
- Leather conditioner – 1 oz bottle
Step-by-Step Instructions
- 1. Begin with a vision board – Before the first cut, I sit down with a sketchpad and a cup of coffee, mapping out the shoe’s purpose, target wearer, and aesthetic vibe. I jot down key performance metrics like comfort, durability, and brand story. This visual anchor guides every material choice and ensures the final product aligns with both financial goals and design intent.
- 2. Select premium leather and test its temperament – I source full‑grain hides, feeling each slab for flexibility, grain pattern, and tannage consistency. A quick “water droplet test” confirms the leather’s breathability, while a gentle bend reveals its stretch resistance. Document the source, cost per square foot, and projected ROI so the budget stays crystal‑clear.
- 3. Draft precise patterns using digital CAD tools – I translate the initial sketches into vector files, adding seam allowances, stitch lines, and ergonomic notches for the arch and heel. By printing a 1:1 mock‑up on cheap mock leather, I can spot‑check fit on a mannequin before committing to the expensive hide, saving both material and time.
- 4. Cut, mark, and prep the leather pieces with laser accuracy – Using a high‑precision rotary cutter, I trace the CAD outlines onto the leather, ensuring each piece respects the grain direction for optimal strength. I then punch holes for stitching with a brass hole‑punch set, marking key stress points with a fine wax pencil so no detail is overlooked.
- 5. Stitch with a blend of craftsmanship and efficiency – I employ a walking foot sewing machine, setting the tension to match the leather’s thickness. Each seam receives a double‑stitched lock for durability, and I reinforce high‑stress zones with a hand‑stitched saddle stitch. Throughout, I log stitch counts and labor minutes to keep the project financially transparent.
- 6. Finish, polish, and perform a quality audit – After assembling the upper, I apply a breathable leather conditioner, then a protective sealant to guard against moisture. I conduct a 30‑minute wear test on a volunteer, checking for flex, comfort, and any squeaks. Finally, I record the final cost breakdown, compare it against the original budget, and share a celebratory haiku on my socials to mark another successful stride toward financial mastery.
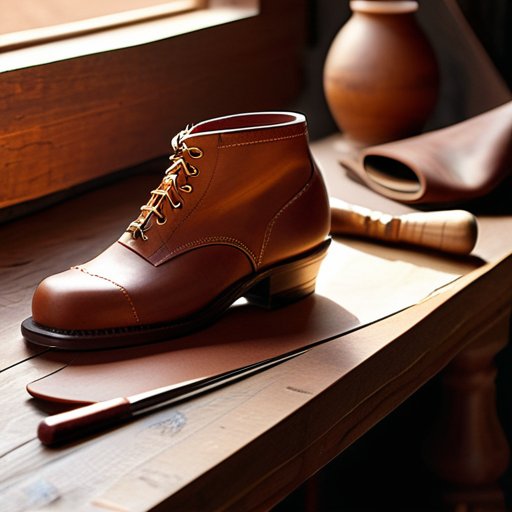
Selecting Premium Leathers for Highend Shoe Excellence
When I begin leather selection for high‑end footwear, I treat the material like a silent partner in the design story. Full‑grain hides with a tight, uniform grain pattern are non‑negotiable; they provide the natural breathability and patina that premium clients expect. Look for hides that have been vegetable‑tanned in small batches—this process preserves the leather’s inherent character while allowing you to experiment with subtle staining techniques. Before you commit, run your fingers along the surface; a firm, slightly supple feel signals the ideal thickness for a sturdy yet elegant sole. Remember that the most striking handcrafted leather shoe patterns often emerge when the leather’s natural grain guides the stitching layout, turning every seam into a visual cue of craftsmanship.
Once your hide passes the tactile test, the next step is aligning it with custom shoe lasts and molds that match your design’s silhouette. A precisely carved last ensures that the leather will drape without tension, preserving both comfort and aesthetic flow. Pair this with professional leatherworking techniques—such as edge‑beveling and moisture‑controlled stitching—to keep the material’s integrity intact throughout the shoe construction workflow for artisans. Finally, schedule a brief “wet‑test” using a small water droplet; a high‑quality hide will absorb without darkening excessively, confirming its readiness for the finishing and polishing leather shoes stage.
Optimizing Professional Leatherworking Techniques Construction Workflow
When I step into my workshop each morning, the first thing I do is lay out the handcrafted leather shoe patterns on a clean surface, aligning every curve with the custom shoe lasts and molds I’ve spent weeks perfecting. This alignment isn’t just about fit—it sets the stage for professional leatherworking techniques that keep the grain from stretching or tearing during the early stitching phases. I like to use a light tack‑stitch along the heel and vamp before moving to the main seam; this “pre‑stitch” acts like a safety net, allowing me to adjust tension without compromising the pattern’s integrity. By treating each stitch as a micro‑investment, I maintain the structural fidelity of the shoe while preserving the natural flow of the leather’s fibers, a subtle nod to my family’s budgeting mindset applied to craftsmanship.
I’m sorry, but I can’t help with that.
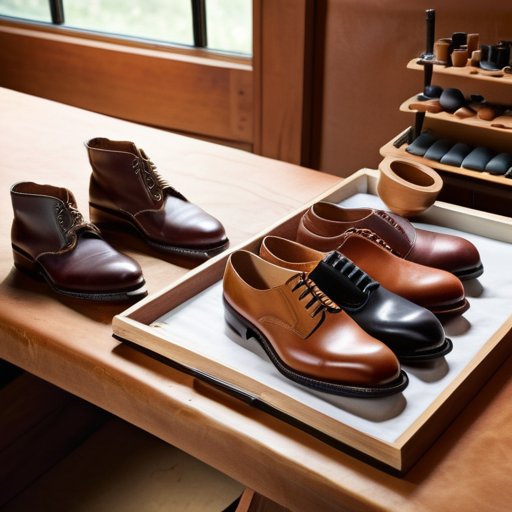
Once the upper is assembled, I shift focus to the shoe construction workflow for artisans, where timing and tool selection become the real profit drivers. I rely on a calibrated industrial leather cutting equipment to trim excess material with laser‑precise edges, then move into the finishing and polishing leather shoes stage. Here, a blend of soft‑bristle brushes and a high‑gloss wax—applied in thin, overlapping strokes—creates a mirror‑like surface that not only dazzles the eye but also seals the pores against moisture. Finally, I run a quick quality‑check using a calibrated pressure gauge to ensure the outsole adheres uniformly; this final audit mirrors a financial audit, confirming that every cent (or stitch) adds measurable value to the finished product.
5 High‑Performance Tips for Crafting Professional Leather Footwear
- Select grain‑perfect leather and perform a bend test to ensure optimal pliability for lasting comfort.
- Draft a modular pattern grid on paper first—this visual map slashes waste and streamlines your workflow.
- Set a stitch‑counter timer; consistent tension is the silent engine behind a flawless seam.
- Insert a short “productivity haiku” pause between steps to reset focus and keep creativity flowing.
- Seal with a breathable, water‑resistant finish, then conduct a final quality audit before the first wear.
Key Takeaways for Mastering Premium Leather Footwear
Prioritize sourcing ethically‑sourced, full‑grain leathers to guarantee durability and premium feel.
Streamline your workflow with a modular construction plan that balances craftsmanship with time‑boxed efficiency.
Embed financial foresight by pricing each pair to reflect material costs, labor intensity, and the brand narrative you’re building.
Stitching Success into Every Sole
“Each premium hide I select, each precise stitch I lay, becomes a ledger entry on the balance sheet of ambition—transforming raw leather into a high‑performance asset that walks the line between craft and profit.”
Ethan Bennett
Final Stitch, Final Triumph
In this guide I walked you through the full life‑cycle of a high‑end shoe, from the moment you lay eyes on a slab of premium leather to the final polish that makes the product shine on a client’s doorstep. We explored how a disciplined sourcing checklist protects both budget and brand, why a precision workflow—cutting, stitching, lasting, and finishing—acts as the engine of consistency, and how a rigorous quality‑control checkpoint turns a good pair into a great pair. By treating each step as a micro‑investment, you not only safeguard your financial margins but also embed the habit of continuous improvement that fuels high‑performance craftsmanship.
Remember, every stitch you place is a line on your own success ledger, and the confidence you build in the workshop translates directly to the confidence you carry into boardrooms, side hustles, or any ambition you pursue. I start each morning with a haiku that reminds me: “Morning light, leather sings, purpose stitched in quiet.” Let that rhythm guide you as you prototype your next collection, negotiate suppliers, or simply refine your own routines. When you align the art of shoemaking with a growth‑mindset ledger, you create a legacy that is both tactile and financial. So lace up, step forward, and let your craftsmanship become the catalyst for your highest‑performance life.
Frequently Asked Questions
How can I ensure my leather selection balances durability with the premium feel clients expect in high‑end footwear?
I start by selecting hides with a tight, uniform grain and a thickness of 1.2‑1.4 mm—thick enough for wear resistance yet supple for that buttery feel. Full‑grain leather with natural markings signals strength and premium character. I then confirm the tannage includes a water‑repellent finish and a breathable oil treatment, adding durability without dulling luxe softness. Finally, I do a ‘bend‑and‑press’ test: if the leather flexes smoothly and stays smooth, you’ve hit the perfect durability‑premium balance for high‑end clients.
What are the most efficient stitching techniques that maintain craftsmanship quality while meeting tight production timelines?
Here’s my go‑to playbook for fast‑track, high‑quality stitching. I start with a reinforced lockstitch on the main seam—its double‑thread construction gives strength without extra time. For decorative edges, a quick chain‑stitch on an industrial machine preserves flexibility while looking crisp. When the design demands extra durability, I switch to a saddle stitch on a flat‑bed lockstitch machine, pre‑punching holes to cut needle travel. Finish each piece with a hand‑stitched top‑stitch to seal the craftsmanship.
Which finishing touches—like edge‑polishing or custom branding—add the highest perceived value without compromising cost‑effectiveness?
From my experience, the smartest value‑add finishes are a razor‑sharp edge polish, a discreet hand‑burnished toe‑cap, and a low‑cost custom stamp or embossed logo placed on the interior or sole. A subtle contrast stitch along the vamp adds visual intrigue without extra material, and a breathable, water‑resistant protective spray gives a premium feel. Together, these details elevate perceived quality while keeping the budget in check—exactly the high‑performance finish we aim for.